Sunday, June 29, 2014

Theme, Variations, and Google Forms


A few years ago I got a genius idea driving from Virgina home to Philly with my brother while listening to the soundtrack from Disney's Up! If you've ever heard the music, you know how absolutely amazing it is but as a music teacher, you probably also know how the whole movie is a text book example of Theme and Variations.

Knowing that I was getting 10 iPads for my music class, I was super excited to show my principal that I wasn't just going to buy apps and play games, but I was going to make the kids think and create!

We've all cried during the first ten minutes of the movie where the theme is stated and varied about 10 times with different connotations.  (I put the YouTube clip below! ;)  I introduce this to the students and we pick apart which characters are present, at what age, the mood, the lighting, how many instruments are playing, which instruments are playing, etc.  I got real deep in our class discussion and require words better than happy and sad so that when I let them loose I get some thought out of them.

In groups, I have the kids watch a random clip of the movie (in Dropbox) searching for a variation of the theme.  I used to have them fill out a worksheet, but then I remembered Google Forms! I set up a form with all the same questions and put a QR code on the SMART Board for my students to scan!

The best part was that as they all sat around with their headphones (the quietest my room has EVER been!) I was watching their responses pop up on my screen LIVE!  I could tell how many clips each group was going through, how fast, how much thought went into their responses, etc.  I could redirect behavior or prompt groups to think deeper and they think I'm magic knowing what's going on on the other side of the room!

Here's a link to my Google Form for UP! Theme and Variations.

*sniff*sniff* tissue?

Saturday, June 28, 2014

The Magic of Dropbox


Dropbox is a technology infused teacher's magic wand.  I wonder if the Dropbox people know how much their resource is being used by teachers.  Here's my top 10:

1. Putting photos onto student iPads
2. Putting music/videos onto student iPads
3. Taking documents/files from my home computer and accessing them from my school computer
4. Storing and sharing lesson plans for the year with my principal
5. Teachers sharing folders to collaborate both in the classroom and in PD
6. Storing videos and sharing via QR code links (or direct download to parents!)
7. Storing documents to share with random teachers via download links on FB, Twitter, etc.
8. Transferring scanned images to make Explain Everything Presentations or Educreations Lessons
9. Accessing documents on any device (iPhone, iPad, Computer)
10. Free storage!

Tech Specs: I have each iPad set up with an individual account.  I did that for two reasons.  First, I wanted to be able to share certain folders with certain iPads (not blanket) and I didn't want everyone having access to my personal Dropbox.  Secondly, I wanted the free storage upgrades with every referral to an iPad!  (I have 9.2GB for free and I'm using 71% of it right now!!) 

My students know how to go into the Dropbox App and I tell them which folder to look in for the particular project.  Here are some of my projects so far:


1. Students access video clips and compare film score for Theme and Variations
2. Students access pictures/video to create a Music Video in Explain Everything
3. Students teach themselves rhythm patterns with video example as reference
4. Students access BINGO card pictures for rhythm notation review
5. Students save projects in Dropbox for simple teacher review

By far the easiest way for me to get files to the iPads (without going through the iPad cart in the other building) is Dropbox.  Students as young as 2nd Grade have been very successful following directions to utilize the app and my assessment of projects is much simpler accessing all their files from my iPad instead of from 10 individual iPads.

The How To:  If each iPad has a unique email, you can set up individual Dropbox account.  (Use the referral program through your personal account if you want free storage!)  Make sure you sign into each account on the iPads so your students don't have to later.  In your personal Dropbox account, create folders and share them with the iPads you want to.  Then start sharing!  You'll have to train your students how to navigate the folders but experience tells me students are so quick to pick up new apps and aren't afraid to try!

Happy Sharing!

Friday, June 27, 2014

Explain Everything App


My favorite classroom app is Explain Everything because it is so versatile and I have the kids SHOW me what they can do rather than simply tell me.  This app has absolutely NOTHING to do with music.  It's not a game either.  But the kids still love using it and I love showing it off!

In my last post, I explained how to take a SMART Board activity and put it on the iPads so more students can be engaged at the same time.  This post will explain how to build an Explain Everything presentation.  If you missed that post, you can find it here.  Turn an iPad into a Smartboard!

So, if you haven't downloaded the app yet, head over to the App Store and pick up a copy.  It's totally worth the $2.99.

When you open the app, it will take you to the Home Screen.  Press the + button in the top left and select a color template.
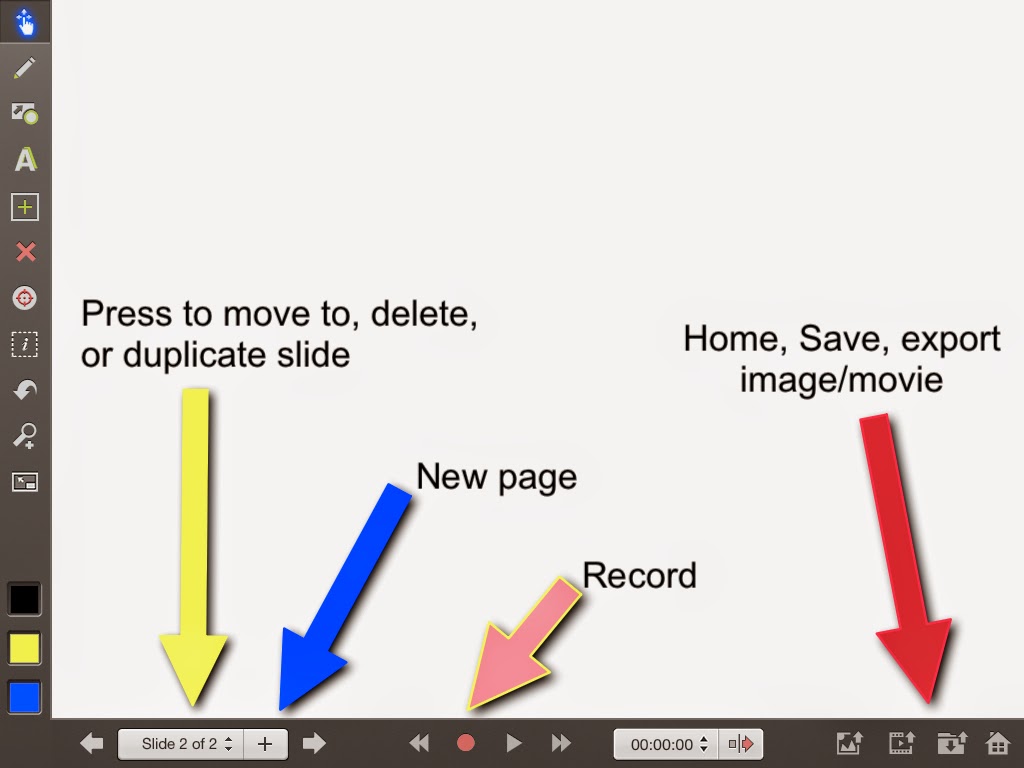
On the left side of the screen you will see a whole bunch of tools.  Below I listed what some of the most important ones are.

Some of these are self explanatory.  Drawling tool, Writing, Undo...   But one nice thing to remember, this is an App on an iPad!  Which means you can use gestures to make objects bigger or smaller (pinching or stretching fingers), move things around, and spin things in circles.  


Couple tools that need explaining: Add.    When you press the add tool, it opens up a world of possibilities.  
Add an existing photo/video (from your camera roll)
Add a file from Dropbox, Evernote, Google Drive, etc.
Add a  new browser window (to annotate on top of a website!!)
Take a NEW picture 
Take a NEW video
Add an existing sound
Like I said, the possibilities are endless!  When you click on new picture or video, it automatically starts up the camera.  I use this one the most for when my students are videoing each other or snapping a picture of a task card.

The bottom menu also has some useful tools.
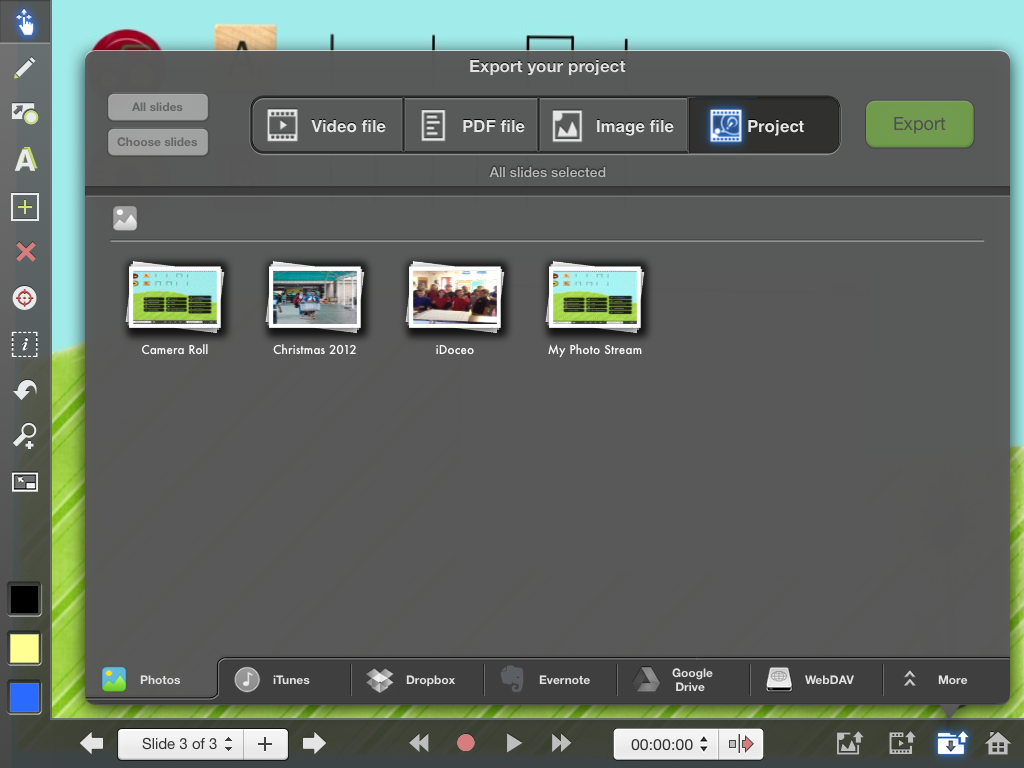
Record option is REALLY cool but right now not important.  Save/export is good to know!

Now let's get back to building our EE presentation to pair with the SMART Board activity.  I'm going to skip past building the SB activity and pretend you already have your images saved in Dropbox.  If you have no idea what I mean, head back to the previous post about Cherie Herring.

On our blank EE presentation, you want to Add an Existing Photo from Dropbox.  If you haven't signed into your Dropbox yet, it'll help you do that.  Select the image you want to be your first page (same first page as SB activity).

Resize the image to fill the page (using your pinching/stretching gestures) then press DONE (top right).  If you wanted to crop or rotate the image, that was the best time.
Now you're on the presentation slide again and I'll explain another tool: Inspector.  When you press the Inspector tool, it will turn blue.  Then click on your image (that's taking up the whole screen) and whole new set of options will appear along with what my 4th grade computer teacher called "marching ants."
If you're familiar with building your own products either in Word, Pages, SMART Notebook, or another editing software, than a lot of these options make sense to you. Even if you're not, many of these options are self-explanatory.  The one we want is Set as Background.  With our image as the background file, everything will be added on top and students will be able to draw on top of the image as well.  The image will never be able to be erased by mistake.

Since my SB activity only asked them to draw, that was all I had to set up!  I got a new page, and did the same to my second page and so on until I finished.

All done!  Click the save button and enter a project name.  Export to Dropbox but be sure to export as a Project! The end goal is that the students open the project using Explain Everything on their own iPads.
All that's left to do is follow the instructions from the previous post to make a QR code from Dropbox and put it in your SB activity!

I love Explain Everything.  SOO many ways to use this app!   


edit://

I linked up with Mrs. Beattie's Classroom linky party all about Smartboard Resources!  Check out other posts here:   
http://mrsebeattie.blogspot.ca/2015/07/making-most-of-your-smart-board.html


Thursday, June 26, 2014

Cherie Herring is my idol

If you know anything about Cherie Herring, then you know how absolutely amazing she is as an elementary music teacher integrating technology.

If you teach music, love technology, have an iPad, have a SMART Board, or are interested in a Flipped Classroom, then be prepared to spend HOURS on Cherie's website.

I am ALL of the above and therefore have spent many many MANY hours on Cherie's website.  Both me and my principal are very thankful for Cherie.

One of my FAVORITE things I learned from Cherie is now to use the Explain Everything App to turn my SMART Board presentations and put them on student iPads so we could all work together!  After I bought an example lesson from Cherie (Turkey Solfege in TPT <--- My kiddos LOVED this!) I figured I could make my own!  The process was a LOT more simple than I expected and my students were much more engaged when everyone gets a chance to participate at the same time rather than taking turns to come up to the board.

So here's what I did.

Step 1: Create SMART Board Activity. 

My 2nd graders were reviewing form so I made an activity where they had to transfer the rhythm patterns onto the form below.  This was meant to be a one class activity (less than 20 min) so I only made 5 or 6 pages.  At the end, I left the form blank and gave the students the opportunity to create their own form and have a friend transfer the rhythm patterns.


Step 2: Export to Image Files.

I want to eventually make an Explain Everything presentation to share with my students so I need to get my SMART Board Activity pictures on my iPad.  The easiest way (in my opinion) is Dropbox.  I exported my pages as .jpegs and saved them in my Dropbox account.


Step 3: Build Explain Everything Presentation
If you have never built an Explain Everything before, stay tuned for another post.  There are a couple tricks and tips I'd love to share!


Step 4: Save EE Presentation in Dropbox
I took my .xpl file and saved it in Dropbox so I could create a QR code!

Step 5: Create QR code 
Copy the link of the .xpl file from Dropbox and make yourself a QR code to add to your SMART Activity.  That's it!


I put instructions for my students on the SMART Board so I don't have to keep repeating myself but they pretty much know what to do.  

Here's a link to my Sunflower Form file!  Let me know what you think!

And a HUGE thank you to Cherie for sharing all her AMAZING ideas!