Saturday, January 20, 2018

Drums Alive! How to Get Started!

Drums Alive (or any kind of drumming on a fitness ball) is becoming pretty popular in schools as either part of the music classroom, PE class, or even after school clubs.  I started an after school program two years ago with the intent to be a performance club.  My principal didn't give me a budget to get started, but I still wanted to get the most for the money!  Here are some of my trade secrets!


Fitness Balls

Sunshine Yoga
Size: 65cm 
Price: $6.99 each (20 or more)

They only come in purple for this size.  I've gotten two years out of the balls so far and only one popped (while in the possession of a parent so I don't really know what the cause was).

Stabilizers

Walmart
Price: $11.52/case of 12

These baskets are the perfect size, but sometimes I wish they were a little heavier.  I've considered adding a bean bag or something to the bottom.  I like the openness of the basket to put sticks in when they aren't necessary.

Sticks

Amazon
Price: $23.95/20 sticks, 10 pairs

Cheap and simple.  Haven't broken a stick over the 2 years.


Logistics
The initial set up is quite time intensive.  I have two electronic air pumps, but they seem to over heat quickly and I have to take constant breaks.  My first step is to inflate the balls about 85% to where the ball looks totally inflated, but isn't up to size yet.  I let the balls stretch here for a day.

After they stretch a little, I inflate them fully to 65cm.  I use a ruler to place a box 65 cm from away from the wall.  Then I place the ball in between the box and the wall and inflate again until the ball touches both the wall and the box.


I don't have much storage space for the balls, certainly not in my music room.  We have a technical closet where we store the sound equipment and risers and folding chairs.  From October to February, it is also the home of 25 purple balls! Kids love helping me move them if necessary and our custodian chuckles every time he passes the closet. Once my clubs are all over, all the balls get deflated and packed away in a storage tub.


We practice at our elementary campus but perform at our High School basketball games.  I ask parents to be responsible for their child's ball and only one ball has popped over the two years.  I bring the baskets, sticks, and an extra ball.

Since we perform at half time and it's a timed, we have to be quick.  Our routines are usually less than 2 minutes but we also have to get on and off the court.  That takes LOTS of practice!  I split kids into 4 groups: 2 groups of runners, 1 group of setters, and 1 group of stick givers.  Usually girls are my setters because they pay attention to details and the boys just want to run.  One group of runners take a ball and basket each to the center of the court where they meet the setters.  The setters arrange the balls as necessary while a new group of runners comes out with new balls.  The runners keep going back and forth until all balls are on the court and they go to their spot where the stick givers are waiting for them.  We can get about 20 balls set and spaced correctly in about a minute.  After our routine, students put their sticks in the basket, grab their set up and run off the court.


Drums Alive has been a lot of fun for me and the kids!  My last post gave an overview of the DRUMTASTIC! curriculum, which I've continued to use, but I also purchased the Kids Beats 3 CD that has a lot of fun music and choreography!  I was disappointed with some of the lyrics from Kids Beats 1 but have found much more elementary appropriate music in Kids Beats 3.


Tuesday, August 8, 2017

Oops! I Don't Have My Instrument! QR Codes + Google Forms


Last year I saw a teacher blog showing how she used QR codes and Google Forms to keep track of student late work.  I loved the idea of Google keeping records for me, but late work isn't something I worry about much in music class!

But keeping track of students forgetting their band instruments is certainly a problem I'd like solved!


When a student enters band class and has forgotten their instrument, they know to grab an iPad and scan the QR code on the wall.  All I ask from them is their name and reason for forgetting.  It takes just a few minutes and I don't have to deal with students making excuses to me and interrupting what ever else I'm dealing with in those first few [chaotic] moments of band class.

Here's a peak at what Google shows me in my response view: 
I can easily see students who have forgotten their instrument more than others and hovering over each of the blue bars gives full data (first/last name).

It makes sense that students forget their instrument because the morning is busy.  It means something (to me, at least) that the instrument was in their thought process, but they got caught up rushing out the door.  


I have this same set up for keeping records behavioral issues as well!  Rather than jotting a note to myself real quick after a class of who had to sit out and what was going on in the class, I have the student scan the QR code and fill out the form!  Google keeps more accurate data than I could with date and time as well as what kind of activity the student is removed from.  


I call this my "Decision Reflection" form because I like that students are removed from the activity, but also given an opportunity to think about what just happened and why they were removed.  I usually can't stop and talk to the student who was removed until after class since I need to continue class with all the other student, but this form requires them to recognize what's happening in class and what's happening with their own behavior.

I made my form with check boxes so students can give as much information as possible in a small amount of time, though  I do ask them to write a sentence of their own at the bottom of how they can make a better decision next time.


The result data that Google shows me is very helpful to see what kind of behavior trends are happening in my room and if maybe I need to revise or revisit my procedures in a particular activity.  


I saw a lot of success with these QR codes and Google forms last year.  My accuracy with records was impeccable and students could take some more responsibility for themselves!  Did I mention I can send the form results to parents!  Too easy!!

A quick how-to: Make a new Google Form.   Click SEND to find the link.  Create a QR code (I use www.qrstuff.com).  Print and post!  


Wednesday, March 15, 2017

Drums Alive! DRUMTASTIC! Curriculum

If you haven't heard about Drums Alive yet, take a look at this fun video!


I've seen similar videos to this, but this particular one got the attention of my principal, which in turn got me the funding to start a Drums Alive program at my school!  If you're interested in using the Drums Alive program, here are some tips and tricks I've learned.

History:  Drums Alive is a fitness program created by Carrie Ekins in 2001 as part of her own physical therapy journey.  Adding drumming and rhythms to her PT was a refreshing and enjoyable way to renew her strength both mentally and physically.  To share these benefits with our young ones, Carrie has worked to create a globally used fitness and education program.

DRUMTASTIC!:  Drumtastic! is the educational curriculum designed for grades kindergarten-middle school.  This curriculum includes a mountain of resources and lesson plans.  The price varies ($200~$500) based on whether you choose online access or the printed curriculum.  With the online access, printing is permitted, but access is only for 1 year.  I chose this option and spent a good amount of time downloading, organizing, and printing over 600 pages.  Thankfully, I have HP Instant Ink and printed them all full color for less than $20!  Check out this link if you're interested in learning about Instant Ink! ---> Instant Ink Referral 

The lessons in DRUMTASTIC! are broken up into 8 sections:


Introductory
Rumble 
Balance 
Choreography
Interval
Brain Beats
Cool Down & Relax
Music & Rhythm

Introductory lessons help students get acquainted with drum sticks, balls, and the ball holders.  I skimmed through most of this with my upper elementary students but spent a few lessons with my little guys.  This is where I drilled my procedures and expectations.  We use CLASS? YES? from Whole Brain Teaching in my classroom so when I say class, the response is YES! with sticks parallel from each other apart.  No ifs, ands, or buts.  If you're sticks are making noise when I'm talking, you're out.  We also explored the balls during these lessons.

Rumble lessons are pure fun and a great warm up.  There are running games, partner games, classic freeze dance type games, and more.  Five minutes at the beginning of class to get our brains in the right mindset.

Balance lessons are more for fitness than drumming, but I'd argue coordination and body awareness is an important part of musiking!

Choreography lessons are the meat of the curriculum.  This is what my principal was thinking about when she sponsored this program. These are the routines that you'll see on Youtube and students love!  Most of these routines are similar to aerobic routines that you'd expect from a class at the gym.  It's not impossible for a student to follow along with verbal cues only, but it gets easier with preparation and practice.  There are varying levels in the choreography to challenge the little guys and even the big guys.  Though, in true Orff fashion, I have my students explore and create their own routine sometimes!  

Interval lessons pick up the tempo just a little more!  I haven't used these yet since I don't have the time, but would love to dive into these for my own cardio benefit!

Brain Beat lessons are supposed to be a bit more educational, however, that seems to be a bit of a stretch for me.  There is an alphabet game (find the letters in alphabetical order), create a shape using scarves (sounds familiar...), write a rhyme with a small group (how is this about drumming??).  I think there is good intentions with these lessons, but nothing connecting drums and academics.  Though if drumming and academics was you goal, I'd look into  Academic Beats.

Cool Down & Relax lessons are exactly as they sound.  Stretching and breathing are nice to calm down students and bring their heart rates back down into the normal ranges.  The music is very nice and relaxing for these!

Music & Rhythm lessons include whole notes, half note, quarter, eighths, body percussion, the cup song (again, of course), and some even vs. uneven rhythms.  There is great potential here!

As a music teacher, I've enjoyed this program with my kiddos and have gleaned a lot from the curriculum; however, if I wasn't given the funding, I wouldn't purchase it myself.  The choreography lessons are the meat of the program and I could have purchased just those lessons with music for about $30 with the Kids Beats CD, instead of paying almost $300 for the whole curriculum (which, at the time, didn't include any music to the choreography.  They ended up mailing me a CD after I complained that I purchased a whole curriculum and didn't receive the music to USE the curriculum.  I think they've changed their model since then).

I also don't have enough time to utilize the whole DRUMTASTIC! Curriculum.  I spent about a month with each grade as a unit in the fall to introduce Drums Alive and then hosted a 3 month after school club.  Everyone loved the lessons in class and our after school club performed our routines at some High School Basketball games, but I have so many objectives for my program and can't spend too much time on something extra, even if there are musical goals to the extras.

I'll write another post with some more practical tips with my Drums Alive program.  Balls, stabilizers, room set up, storage, procedures, pricing, etc.  All the boring stuff!

Here's a video of our after school club performing Drums of Africa!  Please excuse their lack of enthusiasm... we're still working on it!


Wednesday, August 24, 2016

Classroom Tour: Me and a Friend!


It's TIME!!

It seems like forever ago that school ended and summer began!  I spend my summers as the technical coordinator of our little private school so most of my summer is at school playing around with computers and projectors and iPads, but it's finally time to start thinking about students again!

Not much has changed in my room this year, but a few GREAT upgrades!
My instrument wall!  New shelves for my class set of handchimes, new xylos, new mallet storage and more!  Check out that new digital piano too!!  witwoo!                      
 
Front of the room

I put my drums on the wall last year!  It worked out so well!

Another view of the front of the room.  Notice my beautiful rug and SitSpots!  I love being able to tell students to put their toes on the green circle, or sit in the purple and blue...  My SitSpots I use for line up dots!  So simple and no arguments or running to get in line or touching other people or MY things!  Best $50 I ever spent on classroom management!

New vinyl decor I designed myself!  I got a Cricut cutter last year and have been using it well!  You can get the cut files here.

My new movement banner!!  I saw this pinned on Pinterest from another music teacher and had to make one for myself!  I am constantly asking my students to move interestingly, but now they have some words to help them brainstorm what interesting means to them in the moment!  Can't wait to dive into my movement activities!

LOVE my xylophone shelves!  Nothing new this year, but just another shout out to Jena Hudson from Sew Much Music for her fabulous orff instrument labels!  I print one large for the instrument and one small for the shelf so students know how and where to put the instruments away.  Get them here! I added pictures of mallets too so students always get the right ones!  This small step saves me so much transition time!

You might remember my instrument shelves that were BIG and not much to look at...  My friend Cherie Herring from Just A Little More shared a DIY post of how she turned her shelves into bulletin boards!  So now I covered my ugly shelves, and have some extra wall space!
New shelves!!  Our enrollment is going up up up so our storage space is going down down down!  I have to store all our musical props and costumes in my room now so a dad built me a shelf over my chairs and stands.  Thanks!

HOLY SMOKES!  This is my favorite addition to my room.  Again, Jena Hudson from Sew Much Music designed this sign!!  I found outdoor vinyl (supposedly it will last for 5 years in the elements) and used my Cricut cutter once again!  LOVE IT!!!

More Cricut, more Jena Hudson!  Totally her idea for the blown up clip art!  The bulletin board reads: Planting the seeds of music for a lifetime of growth.  You can get the cut files here.


I'm super excited about my new classroom management approach for upper elementary.  If a student gets removed, they need to scan the QR code and explain themselves.  It links to a Google Form with questions about what's happening in class and why there were asked to sit out.  I also reserve the right to email their form to their parents!    

Saturday, July 23, 2016

Monthly Planning Strategy

I have tried so many different planning strategies over the years!  My naive 1st-year teacher self thought I would do all my plans on Thursdays for the following week and enjoy my weekends.  Then the school year slapped me in the face and I was playing catch up all the time on Sunday evenings trying to figure out what in the world I'm going to do 10 hours from now with 20 little kindergarteners.

Then my niave 2nd-year teacher self thought I could just reuse all of last year's plans and not have to do most of the work again.  WRONG!

By my 3rd year, I knew something had to change.  I spent a very long time reading through pages and pages and pages of previous plans to make a document that contained ideas (not plans) of what activities I did during each month.  This document allowed for a big picture view of where classes are now and where they are heading but also allowed for lots of flexibility and changes.


I put categories to help me organize the information and with just one set of pages open, I can see my potential activities for the whole school.

Let me be clear: THESE ARE NOT MY LESSON PLANS!  This document simply helps me see what I've done in years past and the progression of activities. As the year goes on, I find new resources and adapt to my students so I adjust my planner too.  I pencil in new things (or cross out others) and update my document for the next year!


Monthly Plans


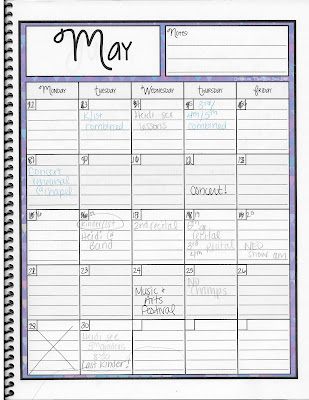
As you can see, my monthly planner is bound (a couple bucks at Staples)  and at the front, I also have calendar pages.  My friend Sara from Music with Sara Bibee has a great set of Calendar and planning pages and I love the simple yet colorful designs!  You can check them out on her TPT Store!
Montly Plans

Planning is still (and will always be) a tedious event, but being able to see options for my whole school at the same time has really helped me stay focused and keep consistency!  You can check out my editable Monthly Planner Template (with and without categories) on my TPT Store!


Monthly Plans


Friday, February 5, 2016

Xylophone Carrying Case DIY


I teach in a small Christian elementary school and for every performance, we travel to our Upper Campus about 5 miles away.  The more Orffy I've become, the more xylophones I've been travelling with and the more nervous I get transporting the bars!  My mother is a seamstress and we've been brainstorming ways to safely travel with bars.  

Then I saw this post on Facebook by Jennifer Loomis!  
 
https://www.facebook.com/bassclarinets/videos/10153693791062777/

Jennifer used a towel and rolled it for protection. LOVE IT!  So I took her idea and ran with it!

I chose to use fleece (in school colors!) and put together a DIY with instructions and pictures. The dimensions of xylophones vary with size and brand, but here are my measurements for Sonor Meisterklasse Sop, Alto/Tenor, and Bass

Supplies:

Approx. 1yd Fleece per xylophone (56")

Finished Sizes: (w" x h")
Soprano: 31" x 24" (13 bars)
Alto/Tenor: 37" x 24" (15 bars)
Bass: 33" x 23" (13 bars)


Directions:

Step 1: Cut fleece to desired length
Step 2: Fold fleece in half and remove any selvage.


Step 3: Fold bottom (folded edge) up about 5.5 inches.  For longer bars, fold up more. Pin and sew three edges (left, top, right.  Bottom edge is a fold). I use a tight zig-zag stitch to top stitch rather than turn inside out.  Fleece doesn't fray and the zig-zag stitch is very strong through the two layers.  


I used my seam ripper to hold the bottom fold in place while I zig-zagged through the 4 layers of fleece where the fabric was folded.  It was a little tough on my little machine, but she made it through!

Step 4: (This step differs from Jennifer.  She suggested placing bars and pinning to know where to sew.  I tried this once but since it was such a short distance, the extra pins were a little tedious and once I removed a pin, I was flying blind.  Instead, I decided I'd rather have a line to follow.)
Measure and mark and sew 2.25 inches for bar pockets (Sop and Alto/Tenor) or 2.5 inches for bar pockets (Bass).


That's it! 


Thursday, October 1, 2015

Brown Bear, Brown Bear: Rhythms and Drums and iPads

I have seen so many melodic activities and variations to this classic children's book.  The simplicity of the repetition lends itself nicely to students singing the question: Brown Bear, Brown Bear, what do you see?  And teacher answering the question to move the storyline along.  I use this book in 2nd grade to assess solo singing and we get out our own beat buddies (aka. Beanie Babies) to sing about more animal friends.

In 1st grade, I wanted to build rhythmic reading skills but pre-notation.  I also finally got a class set of hand drums!  So here's my fun new rhythmic approach to Brown Bear!

Lesson Plan
This "game" has 4 levels.  I've been having tons of success with telling students that we need to master a level before we can "level up" and add something new

Objective: Students will create, read, and perform 8 beat patterns using familiar themes from Brown Bear, Brown Bear


Level 1: Whole Class Verbal
Introduce activity to whole class using the Smartboard.  Students place 4 cards in any order.  Whole class reads rhythm string together using words (brown bear, goldfish, green frog, yellow duck). 

Level 2: Whole Class Body Percussion
Students add body percussion to verbal chant.  I used hand clapping to prepare for hand drums. **Be sure to discuss "Purple Cat" and "Yellow Duck" having more syllables.  This is an important learning step towards eighth notes!**

Level 3: Whole Class Hand Drums
Students add percussion. 

Level 4: Small Groups with iPads
Students create their own rhythm strings on iPads and perform for each other.  I used groups of 2 and one student was the "composer" who created the string while the other was the performer.  Students switch after each turn.


Bonus Round: Double Up!
Two group join forces and place their two iPads together.  Composers work together to compose an 8 card string and both hand drummers perform together.


Tech Specs
Smartboard File
Explain Everything File

You can turn my Explain Everything File into a QR code for easy access for student downloading.